File sharing with a NAS, media server, windows share or other device
Whether you already have a media sharing system on your network or are setting one up for the first time the options can be bewildering. To stream high-quality video you will want the fastest possible connections. Unfortunately, the easiest systems to set up are also the least efficient so some effort is needed to get the best performance. Here are some recommendations.
This assumes you have already set up the wired or wireless LAN connections between the server where you store your media and the client(s) where you want to play it. See here: Setting up your network connection - General - OSMC
Any machine can act as a server, including one running OSMC (see OSMC as a server below). You will get the best performance, especially if there are lots of clients, from a purpose-made NAS.
Choosing a filesharing protocol
If you have a NAS that offers the NFS filesharing protocol, choose that for best performance with OSMC devices. NFS is the built-in network filesharing system in Linux. Windows (but not ‘Home’ versions) also has an NFS client so you can still access those NAS files from Windows.
If you keep your media on a Windows machine then it makes sense to use the SMB protocol, otherwise known as CIFS, especially if you have other Windows machines on the network. SMB is built in to every version of Windows. Linux machines connect to SMB shares using a package called Samba. They can’t join a ‘HomeGroup’ but according to this: http://kodi.wiki/view/SMB/Windows they can access shares created using a homegroup. The Samba client is included in OSMC, the Samba server is optional.
If your NAS or other device where you store media supports only SMB version 1 you may have to adjust the SMB version in Kodi (see below). See also https://blogs.technet.microsoft.com/filecab/2017/06/01/smb1-product-clearinghouse/
If you really don’t want to use SMB on Windows, there are NFS servers available. See here: [How To] Add NFS server capabilities to Windows (free).
We do not generally recommend the use of UPnP for security and performance reasons, but if you already have a UPnP/DLNA server it should be the easiest of all to set up. Some media servers may offer only UPnP for sharing. OSMC has a built-in UPnP server.
Note that any filesystem format can be used with any protocol, for example you can share NTFS files using NFS or Linux (ext4) files using SMB. File ownership and permissions won’t necessarily translate but that won’t matter for media files. It stands to reason though to expect a Windows filesystem to be served best with a Windows filesharing protocol and a Linux filesystem to be served best with a Linux protocol. You can also share the same files with two different protocols at the same time.
OSMC does not support AFP. Apple Mac users can use SMB.
OSMC as a client – using Kodi
If you have a media server already you can connect to it using SMB, NFS or UPnP from the Kodi GUI but you may not get the best performance that way. As an indication of the difference, @angry.sardine has done some comparison between using Kodi’s built-in clients and using operating system clients:
Some rough benchmarks I did just now gave me the following read speeds.
Kodi-level SMB: 192 Mb/s
Kodi-level NFS: 272 Mb/s
Autofs SMB: 904 Mb/s
Autofs NFS: 920Mb/s(Recall that the maximum allowed bit-rate for a 4K blu-ray is 128Mb/s).
When you add a source, you will be able to browse to any available NFS shares or UPnP devices. To add a network share pick Music (say) then Files then Add music and enter the network location as follows or click left to browse to the location.
If using NFS, nfs://SERVER/path.
For SMB, smb://user:password@SERVER/sharename/folder
Note that if you enter your SMB credentials in this way, they will be immediately stored and removed from the screen, so you will just see:
smb://SERVER/sharename/folder
You cannot currently browse to SMB servers if using the latest version of the SMB protocol. This is a major drawback and is because newer versions of Windows don’t allow passwordless (Guest) access to shares. You will have to enter the user, password and location manually.
Instead of entering the whole string for each share, you can choose Browse and then Add network location. Enter the server name or IP address in the Server name field and enter appropriate credentials for access to the server in Username and Password. Hit OK and the server will now appear in the ‘Browse for a new share’ list and you can then browse to any SMB shares on that server available to user. This is useful if you have several shares on one server.
SERVER is the name of the server machine, or preferably an IP address. If using an IP address, it’s best to make it a fixed address by telling your router to always assign that address to that machine. If you do use a Windows machine name, it must be in UPPERCASE. user is a Windows username with access to the share and password is that user’s password. Path is the location of a share in a Linux filesystem on the server, sharename is the name of a Windows share. path and sharename are optional – without them you would see all visible shares on that machine - folder (also optional) is the path to a folder inside that share.
If using UPnP, you must use the browse function.
OSMC as a client – using fstab or autofs
Using the SMB or NFS services in Kodi is somewhat simple to set up but may not deliver the best performance. It may be fine for music and low-resolution video but not for high video bit-rates. For that it is better to ‘mount’ a shared folder in OSMC’s filesystem. You will need to access the commandline as described here: Accessing the commandline.
You make a directory in the filesystem then attach the shared directory to that ‘mountpoint’, usually under the /mnt directory. The share can be mounted automatically by editing file /etc/fstab.
Warning - we have been recommending using fstab for years, and it’s fine when accessing a server which is always on. If the server can go offline (eg a Windows desktop that gets turned off or sleeps) then use autofs as described here: Mounting network shares with autofs (alternative to fstab). Autofs automatically handles creating the mountpoint(s).
Mounting using fstab is described here: Configuring fstab based Samba share mounts or here: Configuring fstab based NFS share mounts
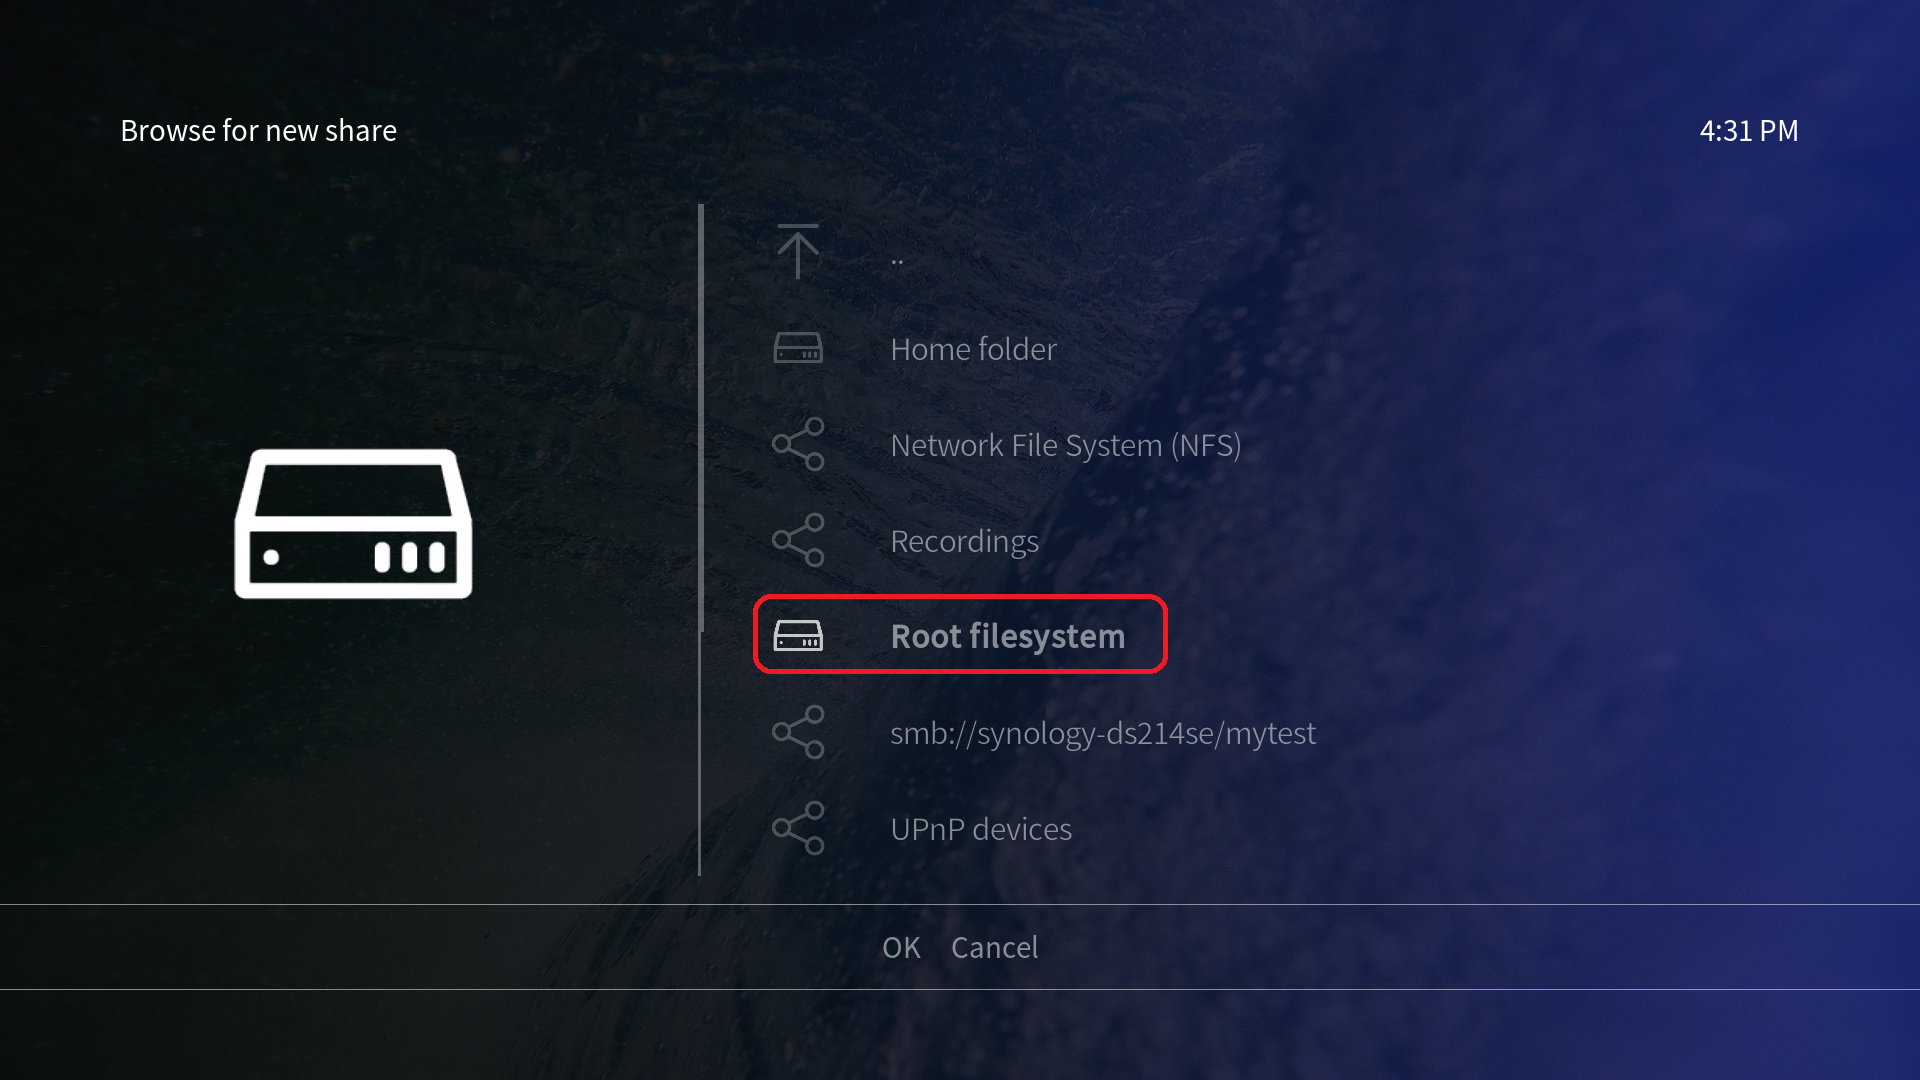
When mounted, the shared directory looks to Kodi just like a local directory so you need to browse to Root filesystem then the mountpoint when adding a media location (source).
OSMC as a server
To share files on your OSMC device with other devices proceed as follows. You can use NFS, SMB or UPnP. If sharing a USB drive or other removable media it first needs to be mounted in the filesystem. OSMC automatically mounts removable devices under the /media directory and automatically shares them if you have installed the SMB server (see below).
To share using NFS you need to install the nfs server:
sudo apt-get update
sudo apt-get install nfs-kernel-server
For NFS do not rely on the built-in automount which mounts removable drives under /media. Instead, add a line in fstab to mount the drive under /mnt so that its location and shared name is predictable. First make a directory under /mnt. Lets call it mySharedDrive.
sudo mkdir /mnt/mySharedDrive
Type blkid at the command prompt to get the UUID of the partition you want to mount. You will see something like this:
/dev/sda3: LABEL="OSMCsystem" UUID="db216be0-6d8e-45b6-97ad-0fd806e961dc" TYPE="ext4"
Then edit file /etc/fstab (sudo nano /etc/fstab) and add a line to it like this
UUID=db216be0-6d8e-45b6-97ad-0fd806e961dc /mnt/mySharedDrive ext4 defaults,noatime,nofail,x-systemd.mount-timeout=30 0 0
but using the value of UUID for your partition.
Mount it with sudo mount -a
Use nano again to make a file /etc/exports which will contain lines like this:
/mnt/mySharedDrive 192.168.1.0/24(sync,no_subtree_check)
and then type sudo exportfs -a
In the example, the drive mounted at /mnt/mySharedDrive is shared with any device on the 192.168.1.x subnet. Access will be read-only by default. For other sharing options refer to linux documentation for exportfs.
Windows machines (Pro, Ultimate and Enterprise) can access NFS shares by adding the NFS client.

It is not possible to browse to an NFS share from Windows but you can go there by entering the location eg \\192.168.1.1\mnt\mySharedDrive in Windows Explorer and you can map a Windows drive letter to that NFS shared directory.
To share OSMC’s files using SMB, install the Samba server from the AppStore. The server automatically shares your home directory and any removable media. OSMC’s automount feature and Samba use the partition LABEL (see above) as the mountpoint and share name. Make sure you set that to something recognisable when you format the drive. Configuration files for the server are in /etc/samba. If you want to change the SMB version or other defaults, create a new file smb-local.conf as described in smb.conf. OSMC’s samba server by default will support any SMB version. To browse to the samba shares from Windows, turn on the SMB 1.0/CIFS Client in Windows features. To force a more secure protocol, add server min protocol = SMB2_10 to the [global] section of smb-local.conf. You may find adding lanman auth = yes and ntlm auth = yes necessary as well.
To share using UPnP/DLNA turn this option on in Settings->Services. Other devices will then be viewing your media through the library rather than directly through the filesystem. They will only be able to access media that you have added to the library, therefore.
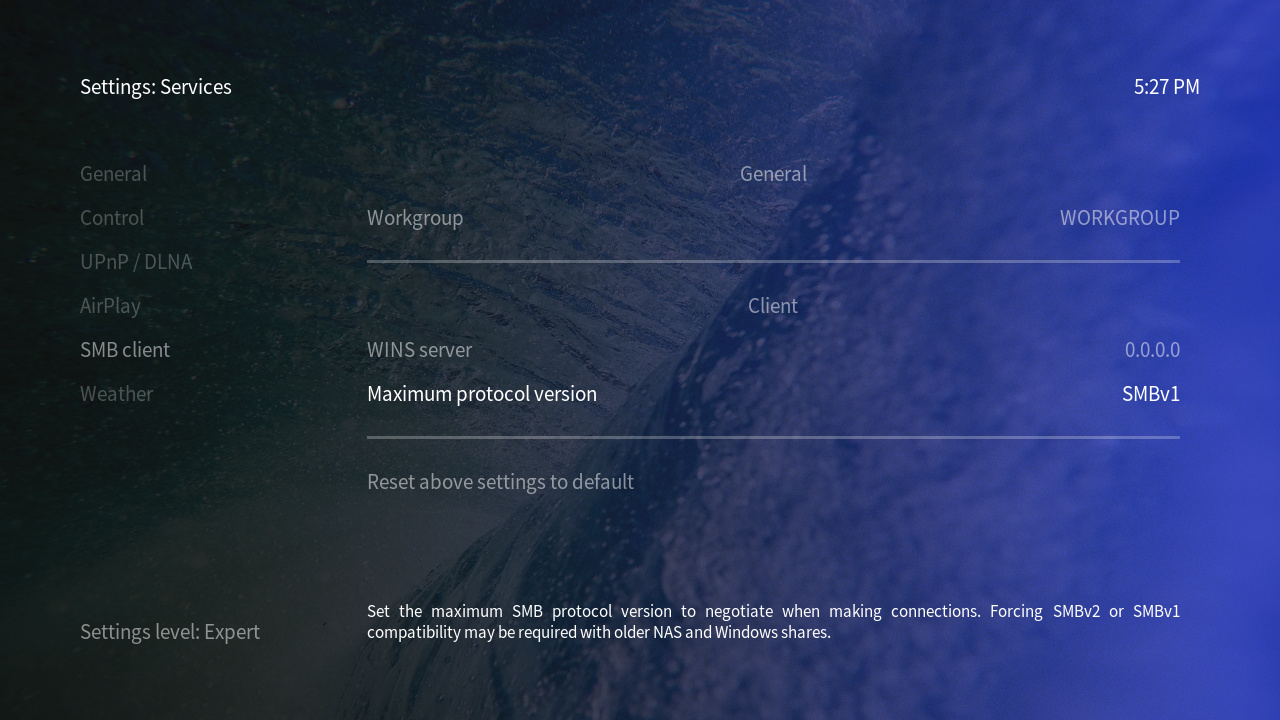
Note on SMB version 1
There are two reasons you may wish to use the old, but insecure SMB version 1. Older devices may support only that version, and it does allow you to browse for SMB servers.
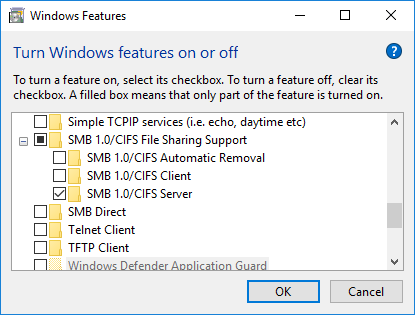
There is a security risk in using SMB1. Do not leave it enabled if you also want to access your files from the internet. To use it, you will have to force both client and server to use SMB version 1. In Windows, search for Windows Features and enable SMB 1.0/CIFS File Sharing Support.
In OSMC, go into Settings, set the Settings level to Advanced or Expert and set the Maximum protocol for SMBclient to SMBv1 or None.